The Work Online and Travel the World Course – Bucketlist Bombshells Review

The Work Online and Travel the World Course – Bucketlist Bombshells Review

The Work Online and Travel the World Course – Bucketlist Bombshells Review

I currently have the freedom to work from anywhere in the world (with wifi!), whether I’m wandering cobblestone streets in Europe or confined to my house due to a global pandemic. But I wouldn’t have this freedom if it wasn’t for the Bucketlist Bombshells.

I first discovered Cassie and Shay, founders of The Bucketlist Bombshells (a life-transforming online education company), back in 2017. I signed up for their Design Skills (which I’ve reviewed on this blog in the past) and Tech Skills courses, followed by their main course, the Work Online and Travel the World Course.

Affectionately dubbed the WTC, this course does what it says on the tin – it helps you build an online business and then take that business anywhere you want to in the world! Many “work from home” opportunities are just that – locked to your location by product inventory or in-person clients.

Now, more than ever, it’s important to build a business with a little more freedom than that. If suppliers dry up and you can’t reach your clients in person, will your business still thrive? Cassie and Shay show you exactly how to build a business that is truly online so you can grow as the world changes.

This isn’t some instant business scheme. Right in the introductory module of the WTC, Cassie and Shay recommend that you set aside at least 3 hours a week to start building your business with a strong foundation.

Each of the modules contains video lessons and worksheets, as well as links to additional resources.

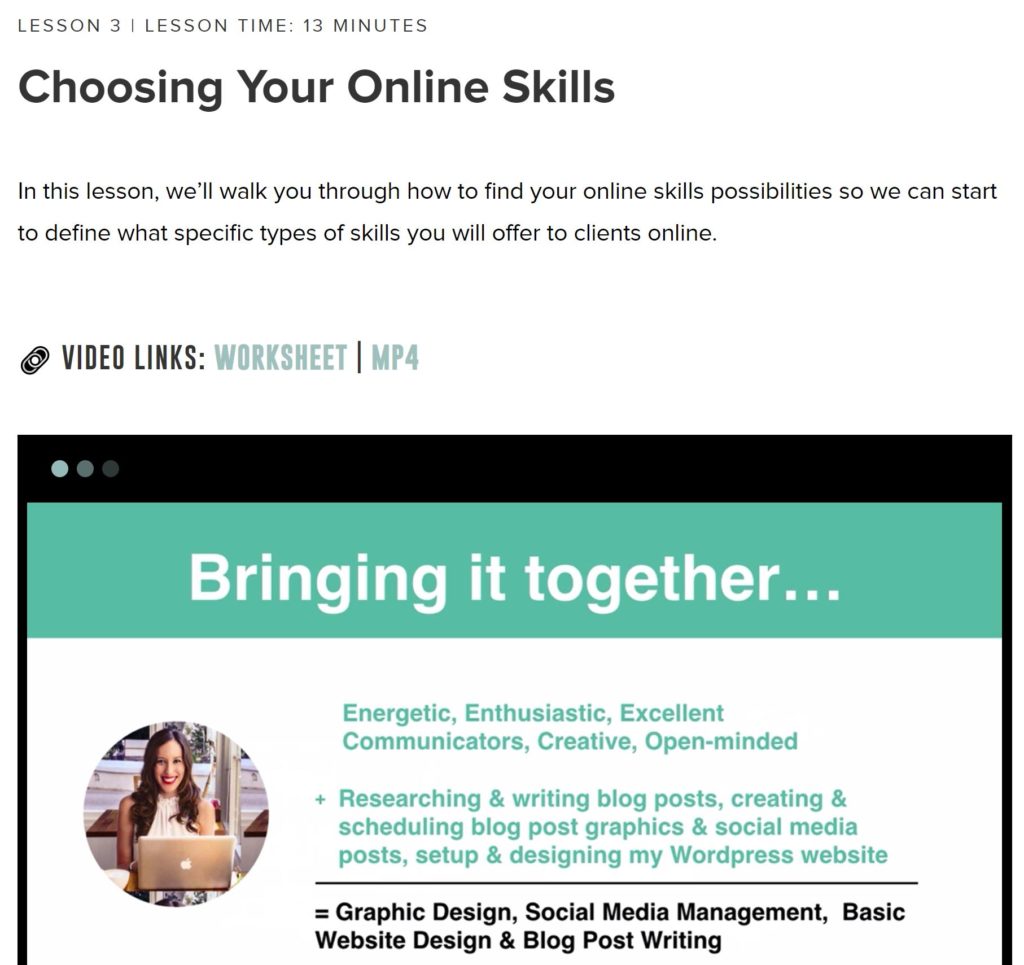
Module 1 – Defining Your Online Skills

This module mirrors the Bucketlist Bombshells’ free workshop (which you can check out here!), with helping you blend soft skills and hard skills to figure out which type of business is right for you. I am a huge fan of personality typology, so I love that they use Myers-Briggs to help students identify their soft skills.

Module 2 – Rock the Freelancing World

Take the first steps to build your skills and grow your experience with online freelancing sites. While I didn’t use this strategy, it’s helpful if you’re feeling a bit apprehensive about getting paid for your services. It also offers tips you can use outside of these freelancing sites.

Module 3 – Build & Launch Your Online Business

This module moves away from working for rates others determine to setting your own rates – with lots of help and advice! From researching competitors’ rates and finding out the cost of living in destinations both local and global, to using the calculator they provide to analyze your lifestyle and needs so you can know your rates will provide enough to live on (and not be surprised by business expenses and taxes along the way). There are also videos to help with two key aspects of signing clients – one lesson on deliverables and client expectations, and another on landing clients via video calls.

Module 4 – Find, Network & Land Clients

This is one of the meatiest modules in the entire course. Not only do you learn how to to set up your packages, Cassie and Shay walk you through everything you need to include on your website, and then offer an hour-long tutorial to get everything set up on Squarespace! On top of that, they show you how to start finding clients outside of freelancer sites, sharing the insider tips they used to build their own businesses.

Module 5 – Running & Rockin’ Your Online Biz

Setting up smooth processes is absolutely key to wowing your clients and growing your business (without going insane trying to remember everything)! Cassie and Shay walk you through SIX of their favorite programs to keep things organized, as well as outlining a workflow and a finance sheet (complete with tutorial) to track everything.

To be honest, I already owned or subscribed to different software than the ones taught within this module, so it wasn’t as useful for me. Also, many of these programs have their own video tutorials, which are keep more up-to-date. The biggest benefits of this module are that it helps you to figure out the types of programs your business needs (a way to send proposals, a way to schedule calls, etc.) and gives you tips on how to use these programs for your specific business (what features are important, what can you ignore for now).

Also, while the finance sheet will help you get a great overview of your business and its money, you’re going to want to invest in some other sort of accounting software soon after you get a client or two under your belt (or before).

Module 6 – Run Your Biz & Jet Set Around the World

Finally we get to the Travel the World part of the WTC! This is where the course differs radically from many other “start an online business” courses and programs. This module is full of practical advice like choosing where to go, how to book accommodations in your new place, how long to stay in one area, and more! They also keep you on track with your business during this transition – remember, you’re not on vacation here!

One of the main points of this module is moving somewhere with a low cost of living, so that you don’t have to worry about bringing in as much money while your business is still growing. Also, it’s up to you how soon you want to jump into the travel part of this after you start your business.

My situation was different. I have little desire to live in many of the locations they suggest (which are often in hot climates – I prefer 60F/15C weather!) and wanted to explore Europe more instead. While some countries in Europe are lower cost than others (generally warmer spots too), it still would be a big investment, as I was also planning to keep a shared apartment back in the US so I could spend some months of the year near my family.

Instead, I found a different option to make my specific travel dreams come true – house sitting! I have a whole post about it here. I’m watching people’s homes and pets (usually cats) while they travel. My sits can last anywhere from 4 days to 2 months, and I’ve stayed in England, Scotland, Ireland, Germany, and the US this way.

Bonuses

The Work Online and Travel the World Course includes a number of bonuses (more if you pay in full), but the best ones are included for all students – the student Facebook group and monthly live masterminds!

In my opinion, these outweigh the value of the course itself. Wherever you are in your business, it’s amazing getting personalized advice any time you have an issue! You can post within the group to get tips from other students, alumni, and community managers. This is great when you have more simple questions or those that could use a quick response. But the mastermind sessions are amazing when you have a more complicated or in-depth question about key parts of your business and life as an entrepreneur.

There are also literally dozens of past sessions full of helpful advice! And if you’re not able to make the live masterminds (which are generally at 5pm Pacific/8pm Eastern – so 1am or later when I’m in Europe), you can submit questions ahead of time and watch the replays.

Conclusion

I highly recommend signing up for the Work Online and Travel the World Course from the Bucketlist Bombshells if you want to start an online business! This course will take your from idea to packing your bags! However, there are some people who won’t benefit from this course as much as others.

  1. If your business is already established. This course is aimed at beginners, and while you may greatly benefit from the monthly masterminds, the bulk of the course is about setting things up in your business.
  2. If you’re looking to market products, courses, or coaching services. The focus is on setting up a business model for virtual assistant, design, web design, social media management, and similar services.
  3. If your focus is on being an influencer or blogger. If you want to make money with paid sponsorships or ads, this course won’t help you with that.

But this course is for you if you want to use the skills you already have to start getting paid by clients, if you’re willing to put in the work, and if you want a framework to follow to build a solid business!

If you have any questions about the WTC, leave me a comment and I’ll answer!

Disclaimer: I received compensation for this review, however, my opinions are my own and I had already purchased and benefited from this course years prior.

My Experience Building a Quiz with Interact

My Experience Building a Quiz with Interact

My Experience Building a Quiz with Interact

This post contains affiliate links, which means I may get a small commission to fund my travels if you choose to purchase anything. I’m only an affiliate for products and services I’ve tried and loved, and will always be completely honest about any drawbacks or issues I find!

Are you as addicted to quizzes as I am? Whether I’m figuring out which Disney princess I am (Belle, duh) or evaluating my business knowledge and preferences, I love finding out more about myself.

So when Interact offered me an opportunity to try out their quiz-building platform, I jumped in right away! Who wouldn’t want an inside look at how quizzes work? (Well, I suppose some people won’t care, but I’m a complete geek about stuff like that!)

Starting with Interact

I started with a video walk-through of Interact’s site, and I was immediately impressed. Not only is everything clean and professional, but they have so many integrations and options available for businesses and bloggers to use for lead generation. When you combine the viral possibilities of a great quiz with in-depth data gathering, it’s clear that Interact can be a game changer for marketing.

And with clients like the World Wildlife Fund, The Home Depot, and Greenpeace, Interact plays in the big leagues. But small and medium-sized businesses are not forgotten. One of my favorite tech education sites, Skillcrush (a connection I discovered by happy accident), uses their platform to gain 10,000 subscribers annually, and Interact’s Lite Plan is robust and affordable enough for almost any solopreneur or start-up.

Quizzes can be dead simple or extremely complex. Interact has a library of more than 100 pre-built quizzes in many niches that you can use as is, or customize to suit your business. I started out by choosing one of these templates and examining exactly how all the different parts worked together. The most popular type of quiz is the personality quiz, where choices/answers lead directly to specific result options, but they also offer assessment and scored quizzes. After a few minutes poking around the pre-built quiz, I felt confident that I could create a custom quiz on their platform!

Building My First Quiz

I started with a fairly simple concept for the quiz. As a Pinterest manager, I have potential clients wondering if hiring me is right for their business. And to be honest, many times it’s not the right step for a business to take just yet. If they have no way to convert the traffic Pinterest brings, have no content to promote, or have more time than money to invest in their business, it may be better for them to wait. But for businesses that are ready, this quiz would provide reassurance that a Pinterest manager can help grow their reach, and it would also educate them about some of facets of Pinterest management (design, scheduling, A/B testing). And like some of my inquiry forms, this quiz would give me information about where they stand, to be better prepared for client calls.

Two vital techniques helped me create my quiz easily: 1. Start with the results, not the questions. 2. Draft your questions and the answers they relate to before you start building in Interact. I used Google Sheets to draft my quiz, putting the results along the top as columns and the questions along the side as rows. I learned from the demo and sample quiz that each answer can lead to more than one result, and multiple answers. So I repeated answers a few times in the columns when they would lead to more than one result, and fit two answers in one cell under one result if needed. You may want to grab a sheet of paper to draft if your quiz is threatening to get unwieldy in a spreadsheet.

Interact recommends 5-10 questions for quizzes, with 7 being the sweet spot for people finishing quizzes and getting accurate results. I ended up with 8 for mine.

Putting the Quiz into Interact

Since I had everything ready, creating the quiz in Interact involved mostly cutting and pasting what I’d already written into the platform. I reworded and expanded things as I added them, and even added a few answer options. While drafting was very helpful for getting organized, it was a little tedious entering more than 30 different answers into the quiz – but I do believe that extra step created a more refined result in the end. As I get more familiar with Interact, I believe my drafts will be a little more rough/conceptual before I move them to Interact’s platform.

Also, while my quiz is text-based, you can also use image answers! CC0 stock images from Pixabay are integrated right into the quiz builder, and you can upload your own images as well (there is 2MB limit per image, so you may need to resize first). I did include photos for the cover/intro of the quiz and each of my results, and I highly recommend you do the same, at a minimum. You can also add images to each of the questions.

I added the results first, then put in the questions one at a time, with their answers. I clicked the “Edit Results Correlations” in each question/answer page to match up the answers to the results, which was super easy!

Branding the Quiz

I chose my brand colors and the Google font I use on my site to make the quiz look like it belonged. I also was able to add my logo/favicon, but I was a little disappointed at limited options related to the logo. I also added my photos at this point in the quiz creation.

Quiz Integration

This was probably my least favorite part of setting up my quiz – but it’s mostly because Interact has so many possibilities and I wanted to do it right. Also, connecting to an email service is inherently a lot less fun than dreaming up a quiz! I really love that you have so many options with Interact’s platform – customizing calls to action for each result (which you can do when you create your result options, but I ended up going back and editing them at this point, once I had a clearer picture of where I wanted them to lead).

You can force quiz takers to give their email address before they get their results, but Interact recommends that you offer a subtle “skip this step” option as well.

Interact offers a number of different ways to incorporate the quiz on your website, complete with a WordPress plugin. However, I had several issues with trying to set up an announcement bar for the quiz. First, the color picker was extremely buggy, and I had a hard time adding my color hex codes, as most times I clicked on the popup it would disappear. I also wondered why it hadn’t carried over my brand colors from the quiz. Sure, I might want to switch them around, but it would save a few steps. You can’t change anything but the colors and the text – no font, sizing, button shape/shadow, etc. options.

You also can’t build more than one announcement bar option for each quiz. So with wanting to promote my quiz both here on Create Wherever and on my Quite Katie site, I was faced with a dilemma – which branding should I use for the announcement bar? The navy, light blue, and bright pink of Create Wherever would clash with the peach, teal, and burgundy of Quite Katie. But that was rendered moot by the next issue I faced.

Interact’s announcement bar covers fixed headers. Instead of sitting nicely above all your content like hello/announcement bars are supposed to do, it clumsily overlaps your vital navigation. When my announcement bar didn’t look nice with either of the two options they offered for placement, I researched the issue, and all their help files had was “oh, your site must have a fixed header” – no options for solutions. I reached out to them regarding this, but haven’t heard back.

Since my Quite Katie site has the navigation underneath the main header image on the home page, I was able to incorporated the bar properly on that page of the site only. I changed the branding to match that site, and it was good to go! But I still wanted to have the announcement bar integration here on Create Wherever. I tried searching for Interact and Divi (my site’s parent theme), but came up empty. I then began to look outside of Interact integrations and see how others had included hello bars with Divi. I found a fairly expensive plugin and a free Divi announcement bar generator. The generator had some styling issues (putting the button flush with the bottom of the bar instead of vertically centered) and it, but fortunately I know CSS and was able to fix the issues in the generated code.

So far, my solution works, but I would love to see Interact bring their announcement bar up to the level of the rest of their service. Perhaps they assume that larger companies will already subscribe to a hello bar option?

Conclusion

I’m super impressed with Interact so far, and it has great potential to help businesses grow!

As I just created my first quiz with Interact, I don’t have results to share yet! Look out for an update to this post, or (more likely) a link to a follow-up post after I’ve used Interact for a few months!

I do have one positive story already though – the day after I finished the quiz, a potential client was unsure if she needed a Pinterest manager. I sent her to this quiz, and her result was Yes! Her business could benefit from a Pinterest manager. We have a call scheduled next week!

Try Interact out yourself, and I’d love to hear about your results with the platform!

Want to hire me as a Pinterest Designer and Manager to help you get more traffic, leads, and income for your blog or business? Check out this page to see what I can do to help you grow!

Choosing a City to Work from Remotely

Choosing a City to Work from Remotely

Choosing a City to Work from Remotely

One thing to consider when working remotely is where exactly you will be operating your business! If you’re wanting to work from home in your pajamas, the answer is easy, but if you want to use your new-found freedom to see the world, the possibilities are endless.

I’ll not be going into visa requirements, since that is different for every type of passport and every country, as well as constantly changing. It will also depend on how long you would want to stay in a country.

Most people have a vacation mindset when they travel. If they want to visit 10 countries in two weeks or go explore places without reliable internet, they can. But digital nomads need to be aware of how a change of location will affect their work and their clients. They can still go on a whirlwind tour or trek into the wilderness, but they do it within vacation time they’ve budgeted for themselves and build a more solid atmosphere for their daily lives.

But you can still build this solid atmosphere in amazingly cool places you’ve always wanted to visit!

There are certain variables you’ll want to consider when choosing where to go, and fortunately, a great site exists to help you gauge what cities are ideal for digital nomads! The Bucketlist Bombshells introduced me to Nomad List, a free site (though becoming a paid member has additional benefits) that presents many statistics to help you choose a city!

The main 4 variables the Nomad list looks at are cost of living, fun, safety, and internet. Each of these are further broken down into specific aspects, and they all add up to a Nomad Score.

You can then filter the results by your own preferences. Say you don’t really care where you go as long as you can live there cheaply – you can look for places under $1000 a month. Say you want to go somewhere in Europe – click on Europe. Say you only want places with very good internet – you can see the average bandwidth for the city, and find some coworking spaces with reliable speeds. Say you want to easily fly to surrounding areas – search for airport.

For myself, I’ll like to work from Europe and travel frequently to other countries. The cheapest places are in eastern Europe, but most cities I’d like to visit are in western Europe. Berlin is centrally located and a reasonable $2000/month, and has a very high Nomad Score (plus Germany has a freelancer one-year visa option for longer stays). I would prefer the UK, but prices range from $2500-3000, though that pales in comparison to Switzerland’s and Denmark’s $4000 a month!

And remember, as a digital nomad you’ll be able to change up where you live frequently – so you can balance out a more expensive location with a cheaper one part of the year.

Where would you like to base your business, at least for a few months?

Want to hire me as a Pinterest Designer and Manager to help you get more traffic, leads, and income for your blog or business? Check out this page to see what I can do to help you grow!

Creative Market and Logo Design

Creative Market and Logo Design

Creative Market and Logo Design

In the Logo Design module of the Bucketlist Bombshells’ Design Skills Course, Cassie mentions Creative Market as a great place to buy unique fonts for logo design. I was already familiar with Creative Market, and for a good reason:

They give away design elements every single week!

I don’t always remember to download the files before the week ends and the 6 (yes, SIX free items every week) items are replaced by new options. But over the past couple years I’ve amassed a pretty large library of graphics and fonts that I can now use in my design business!

You’ll want to read through the license terms pretty thoroughly to make sure you’re using the files legally, but you can use the free items and any ones you purchase for clients. They offer bundles all the time, so you can get a great deal and support other creatives at the same time!

But the free items generally are full and complete versions, and you can build beautiful things with them in Adobe Creative Suite.

Thanks to the BB course module on logo design, I was itching to try making a new logo for this site! So I installed some of the free fonts from Creative Market that I thought might be a good fit. I also tried matching them with a few different free Google fonts, with the idea that I could use that font on this site for a more cohesive look. One of the fonts even came with some watercolor elements!

Here’s what I came up with:

I used the Island Style font from Creative Market, and paired it with the Merriweather Sans Serif Google font. I then added a watercolor element that came with the Pleasures font from Creative Market. All free!

That isn’t the final version of Create Wherever’s new logo, but it was really fun to make, and I can’t wait to try out new variations!

What is your favorite place to find new fonts?

Want to hire me as a Pinterest Designer and Manager to help you get more traffic, leads, and income for your blog or business? Check out this page to see what I can do to help you grow!

Stockpiling Resources

Stockpiling Resources

Stockpiling Resources

I have a hoarding problem.

During my past two moves, I got rid of SO MUCH STUFF. A friend took a van load to donate. My little brother made two trips. And I took bags and bags out to the garbage. And I still had around 75 boxes I moved to the new place – not counting kitchen and living room stuff like dishes and food and DVDs. (To be fair, some of the boxes were very small – and about 30-40 were solely books.)

Not good for an aspiring digital nomad. Though aside from Avon products (since I sell Avon) all but a handful of boxes contain stuff obtained 5 years ago or more.

During my last move, I analyzed why I was holding onto so much stuff. Several boxes hadn’t been opened in the years between moves, yet I still felt a deep urge to hold onto the contents. There were 2 reasons:

1. Nostalgia. As an INFP, my primary and third functions, Feeling and Sensing, are both internal. My memory connects powerful emotions to things I can see and touch. If I throw away the thing, it feels like I am throwing away the memory.

2. Fear. Growing up in a large family, there was no allowance and very little money to be earned doing extra chores. If something broke or I needed a gift for someone (8 younger siblings = lots of needed gifts), it generally had to come from the stuff I already had. Handcrafted presents and regifted items were the norm. In my twenties, during times of unemployment or tight finances, I had to delve into my resources again. Selling things online sometimes made the difference between a positive and a negative bank account balance.

Realizing those emotions and improved finances helped me to get rid of more during the move. If the memories brought up by an item made me feel frustrated or blah, I let go of the item. If I didn’t see myself using a resource item in the next year or two, I donated it.

Digital Hoarding

Within the last few years, I’ve transitioned to stockpiling digital resources instead of physical ones. Amazon started it, with digital downloads of TV seasons for $5 and ebooks for 99 cents or free. And entering the world of social media, tech, and design brought me a huge range of valuable digital products at all price points.

Unlike physical items, there generally is not a nostalgia component. And while they are resources that I am hoarding, it isn’t due to fear. I see them as building blocks for the life I want to live.

There are other downsides to stockpiling digital items, however, so keep these in mind:

Organization. How do you find what you need when you need it? Right now, I keep everything in folders based on the source of the item (which will also make checking license permissions for fonts, images, etc. easier in the future). But the more you have, the harder things are to find.

Money. While some digital items are free (like Creative Market’s weekly downloadables), others range from cheap ebooks to thousand-dollar courses. If I am not going to use the digital item or service now, my rule of thumb is that it needs to be steeply discounted to outweigh the costs of maybe never using it. AppSumo is excellent at this – offering lifetime deals at unbeatable prices, usually for tech startups’ services.

Procrastination. I am prone to this. Acquiring instead of practicing. Learning instead of doing. One of the key parts of a great career is to keep learning new things, but that knowledge will remain superficial until you start to use it in your work.

What resources do you tend to stockpile?

Want to hire me as a Pinterest Designer and Manager to help you get more traffic, leads, and income for your blog or business? Check out this page to see what I can do to help you grow!