If you’re new to Pinterest or just need a refresher on the basics, you’ve come to the right place. In this blog post, we’ll walk through the essential features of Pinterest, from your home feed to creating and organizing boards. Let’s dive in!
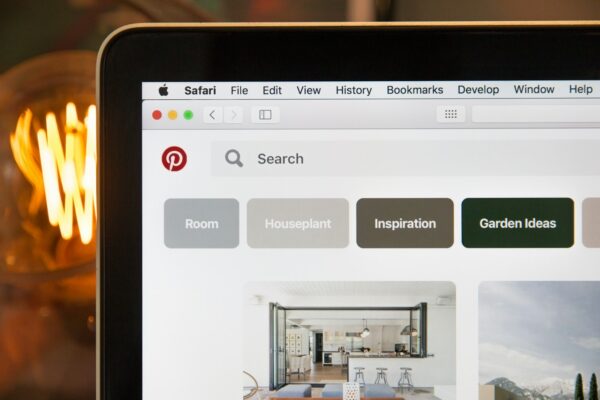
Your Pinterest Home Feed
When you log into Pinterest, your home feed is the first thing you’ll see. This feed is personalized based on your past pinning activity and may include suggested pins, videos, and promoted content. Here’s what you need to know about your home feed:
Personalization: Pinterest suggests pins based on your interests and past activities, so you’ll see a variety of content that aligns with your preferences.
Interactivity: You can save pins to your boards, explore the links, and engage with the content by following the pinners or leaving comments.
Auto-Play Videos: Videos will auto-play in your feed, giving you a glimpse of the content without having to click on it.
Creating and Organizing Boards
One of the key features of Pinterest is the ability to create and organize boards to save and categorize your favorite pins. Here’s how it works:
Creating Boards: You can create boards for different topics or interests, such as travel, art, business, and more.
Saving Pins: When you find a pin that catches your eye, you can save it to one of your existing boards or create a new board to organize similar content.
Search Functionality: Pinterest also offers a search bar where you can discover new content by entering specific keywords or topics of interest.
The Importance of Keywords
Keywords play a crucial role in making your content discoverable on Pinterest. Here’s how you can optimize your pins with relevant keywords:
Pin Title and Description: Incorporate keywords in the pin title and description to improve search visibility.
Meta Description: The meta description from the linked site can also impact the discoverability of your pins, so ensure it aligns with your keyword strategy.
Board Descriptions: Include keywords in your board descriptions to enhance the visibility of your curated content.
Final Thoughts
Pinterest is a powerful platform for discovering, organizing, and sharing visual content across a wide range of interests. By understanding the basics of Pinterest, including home feed personalization, board creation, keyword optimization, and travel planning, you can make the most of this dynamic platform.
Whether you’re a seasoned pinner or just getting started, Pinterest offers endless possibilities for exploration and inspiration. Happy pinning!
Hello, Quiz Enthusiasts! Have you ever wondered what transforms a simple quiz into an engaging experience that keeps participants coming back for more? Well, you’re in luck because today we’re diving into the anatomy of a successful quiz. So grab a cuppa, and let’s get quizzical!
1. The Power of an Interest-Grabbing Title
First and foremost, let’s talk about titles. Think of your quiz title as the flashy sign above a store – it’s what lures people in. A bland or confusing title is like a flickering neon sign that spells “YAWN” in big letters. People will stroll past without a second glance. So, if your quiz is titled “What Website Flavor Are You?” – snooze alert! Instead, make it snappy, make it irresistible, make it something like “Discover Your Digital Persona: What Website Embodies Your Inner Self?” Now, that’s a title that will make quiz-takers stop in their tracks!
2. The Art of Precision Targeting
Next up is focus. If your quiz is as general as “Where in the World is Carmen Sandiego?”, you’ll end up with a hodgepodge of an email list that’s about as useful as a screen door on a submarine. Picture this – a travel guru aiming to attract solo female travelers with champagne tastes on a prosecco budget, but their quiz screams “Plan Your Family Roadtrip Through Nebraska!” The mismatch is as glaring as socks with sandals. You want to laser-target your questions so that your ideal audience feels like you’re reading their diary (in a non-creepy way, of course).
3. Crafting Engaging Content
Let’s not forget about the meat of the quiz – the questions! They should be the conversational, intriguing, and the right amount of challenging. Think of them like a first date – you want to ask questions that are interesting enough to warrant a second date, but not so intense that your date bolts for the nearest exit. A good rule of thumb: if your question could be answered with a disinterested shrug, it’s time to spice it up!
And what’s a quiz without a little eye-candy? Sprinkle in some images to keep things interesting. It’s like giving your readers a visual amuse-bouche between courses of text. But remember, keep it on-brand. If your quiz is about luxury travel, don’t throw in a photo of a ramshackle tent (unless it’s glamping, of course).
Finally, we can’t ignore the grand finale – the results. This is your chance to dazzle your quiz-takers with insights about themselves. The results should be like a fortune cookie that’s actually accurate – revealing something personal and memorable. And, of course, before you hand over that golden nugget of knowledge, nudge them for an email opt-in. After all, they’ve come this far; why wouldn’t they want a souvenir from their journey?
So there you have it, folks – the blueprint for a successful quiz that not only entertains but captivates and converts. Now, go forth and create quizzes that will have the digital world buzzing with excitement!
Welcome to yet another adventure in the world of digital marketing! Today, let’s chat about an often misunderstood—but incredibly powerful—platform: Pinterest. If you’re a coach or course creator, you might be scratching your head, wondering why your pins aren’t taking off like a SpaceX rocket. Well, my friend, strap in because we’re about to embark on a journey to avoid the black holes of Pinterest marketing.
1. The Ghost Town of Content
Imagine walking into a party, and it’s just crickets… awkward, right? That’s what it’s like when you don’t have enough content to promote on Pinterest. It’s not enough to have a shiny product or service—you need to have a buffet of free content to entice your audience. Think of it as the appetizers before the main course; it’s what gets people to stick around and eventually invest in what you’re serving up.
So, what’s the magic formula? Blogs, my fellow marketers, blogs! They’re like the bread and butter of Pinterest. But hey, if you’re more of a podcaster or a YouTuber, don’t fret. Just repurpose those show notes and videos into blog posts. Remember, Pinterest has a voracious appetite for fresh URLs and new content. The more you feed it, the more it helps your account thrive.
2. The Carousel of Sameness
Now, let’s talk about that one trick pony—repeating the same URL like it’s the only tune you know. If you’ve got a main service page or a flagship course, it’s tempting to pin it to oblivion. But here’s the kicker: Pinterest has a nose for spam, and it doesn’t appreciate the smell of repetition. If you’re just looping the same image and link, you’ll be about as popular as a skunk at a lawn party.
However, if you’re a Picasso of pin designs, creating new and exciting images for the same ol’ URL, you might slide under the radar. But why play it risky? Diversify your content portfolio with a blog or other resources. It’s like investing in stocks; you don’t put all your eggs in one basket unless you want to end up with an omelet on your face.
3. The Me, Myself, and I Syndrome
Let’s face it, we all love a bit of limelight, but Pinterest is not the stage for your solo act. Taking an Instagram approach—flaunting your beachside lifestyle and boasting about your riches—won’t cut it. Pinterest folks are on a treasure hunt for solutions, not to swipe right on your personal life.
The golden rule? Lead with value. Whether it’s through educational content or captivating stories, make sure you’re the guide in their quest, not the distracting billboard. Offer solutions, sprinkle in new and useful nuggets of information, and watch as Pinterest users flock to you like seagulls to a chip.
In conclusion, my fellow digital explorers, Pinterest marketing is a voyage of discovery. Avoid the barren lands of insufficient content, navigate away from the spammy seas of repetition, and don’t get lost in the vanity valley. Focus on enriching the Pinterest ecosystem with your valuable insights, and you’ll be the Amerigo Vespucci of content.
So, go forth and pin with purpose! And remember, in the vast universe of marketing, a little humor and a lot of value go a long way. Happy pinning!
Have you ever wondered how a simple quiz can turn a fleeting online encounter into a meaningful connection? Quizzes have a unique way of bridging the distance between strangers on the internet. They’re not just a procrastinator’s delight but a savvy tool for engagement. So, pull up a chair, grab a drink, and let’s delve into the quiz-tastic world of connecting with new people!
Step by Step Engagement: The Incremental Investment
Let’s face it, commitment can be scary. But quizzes, oh those clever little things, they know how to ease us in. Picture this: you land on a page and boom, there’s a quiz staring back at you. It’s not asking for your life story, just a tick in a box. One simple question leads to another, and before you know it, you’re knee-deep in this interactive adventure.
Here’s the kicker: with each question, you’re taking micro-steps towards investment. It’s like nibbling on a cookie rather than swallowing it whole; you savor the taste, question by question. By the end, you’ve invested your time, chosen your answers, and you’re hooked. You need to know the outcome. This breadcrumb trail of curiosity is why, by the time you reach the end, you’re more likely to share that precious email address. You’ve already taken the journey, why not see where the path leads?
A Spoonful of Fun: The Entertaining Aspect
Let’s be real, nobody wakes up thinking, “I can’t wait to read a lengthy blog post today!”, or “I’m so excited to watch that two-hour informative video!”. We’re looking for the fun in life, and quizzes, they’re like the party poppers of the internet. They bring a dash of enjoyment to our daily scroll through the digital mundane.
Quizzes are the cotton candy at the fair of online content – light, breezy, and oh-so-sweet. They offer an escape from the heavy lifting of learning and the dreariness of the day’s news. It’s a playful journey of self-discovery, wrapped in multiple-choice questions. And who doesn’t love a bit of self-revelation with their morning cup of joe?
It’s All About You: The Personal Discovery
Ever had someone talk at you about themselves for hours? Not fun. But quizzes, they flip the script. They make it all about you, the quiz taker. What’s your secret strength? Which 90s sitcom character are you? Which entrepreneurial archetype are you? These quizzes have a way of whispering sweet nothings about your personality, offering insights, or testing your knowledge in a way that feels like a pat on the back rather than a sales pitch.
As you click through these questions, you’re not just learning about the quiz creator’s offerings; you’re on a voyage of personal discovery. And guess what? It’s all wrapped up in a neat little package that flatters your ego and tickles your fancy. By the time you’re done, you’ve not only learned something about yourself but also connected with the creator in a way that feels natural and unforced. It’s a win-win!
In conclusion, quizzes are like the custom birthday balloon of online engagement – they’re a low commitment, fun-filled, and personalized way to connect with new people. They ease you into a relationship with the creator, entertain you along the way, and leave you with a little more knowledge about yourself. So, the next time you stumble upon a quiz, remember, it’s not just a time-killer; it’s a bridge to new connections – and it’s one you can have inside your own business. Now, aren’t you curious which type of quiz your audience will love? Go on, take the quiz!
Hello, dear readers and digital trailblazers! Today, we’re diving deep into the world of email marketing and the frequent faux pas that can make or break your list-building success. So strap in and let’s unravel these mysteries with a dash of humor and a sprinkle of sage advice.
1. The “Sign Up Because I Said So” Approach
One of the most hilariously optimistic mistakes I see fledgling entrepreneurs make is the assumption that people will leap at the chance to sign up for their email list out of the goodness of their hearts. It’s the digital equivalent of setting up a lemonade stand in the desert and waiting for parched customers without even a sign. They say, “Join my newsletter,” but offer no juicy carrot to entice the signup. No sneak peeks, no exclusive content, nothing! It’s like throwing a party and forgetting to mention there’s going to be cake. Folks, unless you’re a secret celebrity, the promise of “daily musings” won’t have people flocking to your list.
2. The Lonely Lead Magnet
Now, let’s talk about the entrepreneurs who avoid mistake number one. They craft a lead magnet, a shiny quiz, or a tantalizing incentive. But then they just… leave it there. It’s like baking a beautiful cake and not inviting anyone to taste it. They don’t drive any traffic to their masterpiece, so it’s impossible to tell if it’s a hit or a miss. Building an email list without a traffic strategy is like trying to fill a bucket with a hole in it. Remember, even the most irresistible lead magnet needs eyeballs to become a list-building blockbuster.
3. The Solo Flight Syndrome
Ignoring the power of collaboration is like trying to play a symphony alone – it’s possible, but why make it so hard? Teaming up for freebie swaps, bundles, or summits can turbocharge your list growth. Sure, there will be freebie hunters, but many participants are savvy and genuinely interested in what you have to offer. While these new subscribers may not be as targeted as the ones who stumble upon your site via Google, they did show up for the party, which means they’re at least a little bit into your vibe. Collaboration isn’t just a buzzword; it’s a shortcut to scaling your subscriber base with kindred spirits.
4. The Fear of Paid Play
Last but not least, let’s talk about paid advertising, the big scary monster under the bed for many entrepreneurs. While it’s true that paid ads are a more advanced game, they can catapult your list growth to new heights if you’ve got your ducks in a row. The key is to either start small or bring in a hired gun (like yours truly, the Pinterest ad whisperer). If your list is converting subscribers into customers at a healthy rate, you can use that data to make informed decisions about ad spend. Remember, the aim isn’t to throw money into the wind but to invest it where it can work its magic for your list.
In conclusion, growing an email list is a bit like gardening. You need the right seeds (lead magnets), you have to water them (drive traffic), sometimes it’s good to cross-pollinate (collaborate), and every now and then, you might want to use some fertilizer (paid ads). Avoid these common mistakes, and watch your email garden bloom!
Till next time, keep testing, keep tweaking, and keep growing. Your email list will thank you!


Recent Comments